Have you searched the target accounts, built a list of qualified prospects, created engaging sequences, and ultimately your emails reached your prospects' SPAM folder?
The most attractive subject lines, engaging content, and CTAs are invaluable if your emails are not delivered. Email deliverability impacts the performance of your sales outreach.
What is email deliverability?
It is the ability to send emails that get delivered to the recipient's inbox, not spam. Here are some proven tips that can improve your email deliverability:
Follow the mandatory regulation based on the CAN-SPAM Act, which includes:
- Avoid deceptive, misleading headers, From names, reply-to addresses, or subject lines.
- Always include an unsubscribe link that works for at least 30 days after sending the email.
- Add your physical mailing address in your signature.
Maintain your contact data hygiene.
You must verify SPAM traps when buying leads from third-party, non-trusted sources. These are email addresses that Internet Service Providers (ISPs) use to identify senders who aren't maintaining their contact list.
Build your contact database organically. Remove the inactive, bounced prospects to avoid impacting your domain reputation.
Verify if your IP is Blacklisted
If your emails are not reaching prospects consistently, check if your sender IP is blacklisted. You can check through online looks such as https://www.whatismyip.com/blacklist-check/
Update Bounced contacts before resending emails
Avoid sending emails to bounced prospects unless they are updated with the correct email address. Sending emails to such addresses can adversely affect your domain and the sender's reputation.
Domain Authentication
Domain Authentication verifies the source of emails by validating the sender's email. It checks for spam or spoof activities by the sender's email.
Domain authentication involves:
Sender Policy Framework (SPF): You can create a record in your DNS (Domain Name System), which lists down all your servers authorized to send emails. When your prospect's email service provider identifies your SPF authentication, it verifies your domain.
Domain Keys Identified Mail (DKIM): It adds a digital signature to your domain to prevent spam and ensure your emails reach the inbox.
SPF prevents unauthorized people from sending emails on your behalf. DKIM looks for a signature by the sender for the smooth transfer of emails through spam filters.
Here's the GSuite guide on Authenticating your Domain:
Why Setting up SPF & DKIM are important?
SPF and DKIM are fundamental for email authentication. They protect email senders and recipients from spam and phishing. Further, your email deliverability increases, and your chances of landing in SPAM decrease.
How do I set up SPF and DKIM?
To set up SPF and DKIM for your mail servers, you should add a "TXT" type record to your DNS records.
Setting up SPF:
The record starts with v=spf1 so that it is identified as an SPF record, and the record looks something like this:
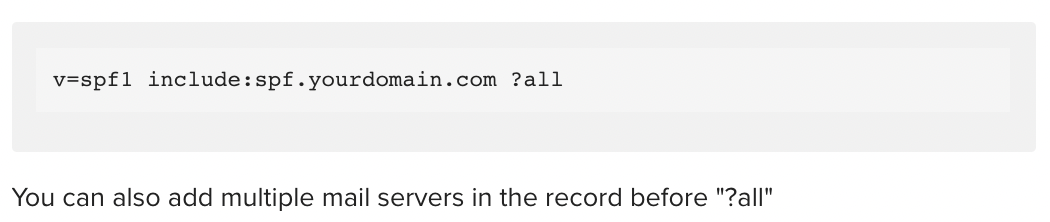
Emails from servers not included in the SPF record are tagged as soft fail. It may get flagged as spam or suspicious. Therefore, setting up SPF helps you land your email in the recipient's inbox.
You can find help on how to setup SPF for a few domain hosts:
Setting up DKIM:
For DKIM setup on your server, you need to generate a public key added to the record, which needs to be added to the DNS records.
You need to access your email provider's admin console to do this. The steps may differ based on your email provider.
After generating the public key, you need to add a record that has the generated key. The record will be similar to this:

The string is the generated key.
Once the record is added, you need to turn on the email signature to start sending emails, including your signature encrypted with the private key.
For more assistance on DKIM setup, you can view the Google and Mircosoft documentation.
Warm-up your Mailbox
Every new mailbox needs to be warmed up by sending emails to trusted recipients (friends from other organizations, clients, and office accounts, both personal and business) and receiving opens and replies.
Start conversations with 10 to 20 individual emails from your new email account. Gradually increase the number of emails sent in a day but ensure consistent engagement. Once your email service provider authenticates the activities, your mailbox will be ready to send cold email campaigns.
Upscale Safety Settings
Admin settings within the Upscale can help avoid being marked as spam:
- Sequence Throttling Limit
- Including unsubscribe links
- Email Alias
- Limit on maximum bulk emails
- Update prospect stage on email bounce
More Best Practices to Avoid Spam Filters
Composing Emails
Subject Line:
- AVOID ALL CAPS AND OVERUSE OF SYMBOLS!?!?!!!!!!!!
- Avoid using SPAM trigger words and phishing phrases like WIN, Free!, etc.
- Avoid too many emojis in the subject line.
Body:
- Avoid using video, Flash, or JavaScript in the email.
- Avoid large attachments, especially .exe, .zip, .swf, etc.
- Maintain an optimum ratio of text to image. Avoid too many large images, even if they make your email look attractive.
- Check the content of your emails to see how standard spam filters rank them with Mail Tester.